Building a Jenkins Pipeline which Deploys to a VMware Cloud PKS Cluster
This article is a continuation of an earlier article, Deploying CloudBees Core on VMware Cloud PKS.
In the previous article in this series, we examined the process required to both create a new Kubernetes cluster with VMware Cloud PKS™ and to install a functional version of CloudBees Core within that cluster. That previous work will function as a starting point creating a pipeline in CloudBees Core which deploys an application into our Kubernetes cluster.
To begin, please log into the CloudBees Jenkins Operations Center (CJOC)
instance as deployed previously. If continuing from the previous article, the
please access the operations center UI on the following URL,
http://<lb-ingress-hostname>/cjoc. To retrieve the ‘lb-ingress-hostname’
value, use the command: kubectl describe service nginx-ingress-controller -n ingress-nginx. The ‘Loadbalancer Ingress:’ field holds value in question. If
you need to recover the admin password for operations center, use this command:
kubectl exec cjoc-0 cat /var/jenkins_home/secrets/initialAdminPassword — namespace cloudbees .
After logging into the operations center, the next phase will be to create a ‘team’. This will also create a specific Jenkins master, where we will configure our pipeline. The ‘Teams’ dialog can be found in the vertical navigation bar on the left edge of the screen, as shown in Figure 1.
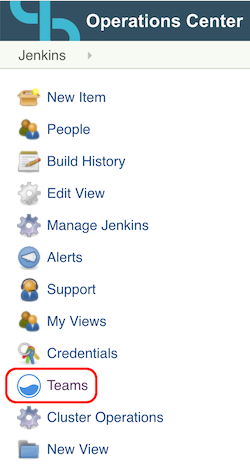 Figure 1. The ‘Teams’ item in CloudBess Jenkins Operations Center
Upon selecting the ‘Teams’ item, a different looking UI will load. To progress, please give the team a descriptive name. The UI will then walk through granting the team an icon, members (please include your own user, labeled with ‘(You)’ trailing the user name). When asked for a ‘Team master creation recipe’ select ‘Basic’. Then click the button at the bottom labeled ‘Create team’. This will cause the operations center platform to create a new Jenkins master with at least one user. Once this Jenkins instance is created, we can begin perform some essential configuration.
After completing the team creation process, you should be returned to the UI you viewed when you first logged in to operations center. If for some reason you are not, please look in the upper right hand corner of the screen for an icon resembling an arrow pointing to the right inside a square box. This is the ‘exit’ icon for the ‘Blue ocean’ UI experienced during team creation.
In order to use the resources included in the GitHub repository for this project (https://github.com/dillson/jw-workshop), we’ll need to add the GitHub plugin to the Jenkins master. Please follow these steps to accomplish this task:
- Use the horizontal navigation bar at the top of the screen to navigate to the leftmost ‘Jenkins’
- From the vertical navigation bar on the left edge of the screen, select ‘Manage Jenkins’ -> ‘Manage Plugins’
- Select the ‘Available’ tab from the top of the main panel. Then search down the list for ‘GitHub plugin’. Check the box for this plugin, then click the ‘Install without restart’ button at the bottom of the screen
Return to the main screen of the Cloudbees Jenkins Operations Center by using the horizontal navigation bar at the top of the screen again. Click on the leftmost entry ‘Jenkins’ On the page labeled ‘Operations Center’ in the upper left hand corner, please find a link to the Jenkins master you created in the central frame of the screen. The link will be of the from ‘Team » {name}’. The name value will match the name given during the team creation process. Please click on that link.
After clicking on the team hyperlink, you should now see the phrase ‘Managed Master’ in the upper left hand corner of the screen. The options in the vertical navigation bar on the left edge should also look different than they did on the previous screen. The next piece of the process will involve entering credentials the pipeline will require to function properly. Please follow these instructions in order.
- Select ‘Credentials’ from the vertical navigation bar on the left edge of the screen
- Look for the section labeled ‘Stores scoped to Jenkins’
- Under that section, click on the link for the (global) domain
- From the vertical nav bar on the left edge of the screen, click ‘Add Credentials’
- Select ‘Username with password’ from the ‘Kind’ dropdown menu at the top of the screen.
- Leave ‘Scope’ set to Global
- In the Username field, enter your dockerhub user name. In Password, enter your dockerhub password. For ID and description, you must use ‘dockerhub’
- Click ‘OK’
- The next credential set will require valid credentials for the VMware Cloud PKS service. For instructions on how to retrieve these credentials, please see the previous article in this series, or consult the service documentation here.
- Click ‘Add Credentials’ from the vertical navigation bar again.
- Use ‘Username with password’ from the ‘Kind’ dropdown menu. Use ‘Global’ as the scope.
- For username, use your VMware Cloud Services organization ID from the cluster provisioning stage.
- For password, use your VMware Cloud Services API/refresh token noted down during Cloud PKS cli login.
- For ID, you must use ‘VCS’. Add a relevant description for your reference.
- Click ‘OK’
The last step before the configuration of the pipeline is to edit the Jenkinsfile within your local clone of the original GitHub repository. This will allow you to edit utilize your VMware Cloud PKS account and the cluster you created, as well as the ability to modify the application code and see those changes reflected.
To modify the Jenkinsfile, please navigate to the directory into which you
cloned the GitHub repository
(https://github.com/dillson/jw-workshop).
This directory is mostly likely called ‘jw-workshop’, unless another directory
was selected during the git clone operation. From within the directory, please
run the following commands:
sed -i 's/dillson/<your dockerhub username>/g' Jenkinsfile
sed -i 's/cb-test-59/<your cluster name>/g' Jenkinsfile
The cluster name is whatever you named your kubernetes cluster during the cluster provisioning steps previously.
Now run:
These commands add, commit, and push these changes to your online repository for the pipeline to read later.
Return to the main screen of the Cloudbees Jenkins Operations Center by using the horizontal navigation bar at the top of the screen again. Click on the leftmost entry ‘Jenkins’ From that vertical set of options, please select ‘New Item’ as shown in Figure 2.
Figure 2. ‘New Item’ on the Managed Master screen
After selecting ‘New Item’ the subsequent screen will show a list of different items which can be created. To begin, enter a name for your pipeline in the text field at the top of the list. Then please select ‘Pipeline’ as the item type. It should be the second item from the top of the list. Then click the ‘Ok’ button at the bottom of the list.
The next screen will be a configuration screen with many options. Please follow the listed instructions in order to navigate this screen. The steps below outline a process to build a pipeline defined by a file (the ‘Jenkinsfile’) which is located within a specified source control management repository (the GitHub repository you cloned a personal copy of). In the previous step, this Jenkinsfile was edited and the new copy uploaded to reflect your personal account and Kubernetes cluster details.
- Check the box in the ‘General’ section reading ‘GitHub Project’. A text box will then appear and ask for the project URL. Use the URL of your forked Github repository. It should be of the form, “github.com//jw-workshop”.
- Under the ‘Build Triggers’ section, check the box labeled ‘GitHub hook trigger for GITScm polling’. This will enable the desired ‘build on git push’ behavior.
- In the ‘Pipeline’ section, location the ‘Definition’ dropdown menu. In that dropdown, select ‘Pipeline script from SCM’
- From the ‘SCM’ sub dropdown menu, select ‘Git’
- In the ‘Repository URL’ text field, enter the URL of your forked repository.
- Ensure the ‘Credentials’ dropdown menu value is ‘- none -’.
- Locate the ‘Script Path’ text field menu and enter ‘Jenkinsfile’
- Click ‘Apply’, the ‘Save’ at the bottom of the screen.
At this point, a fully functional Jenkins pipeline has been created within the Jenkins instance you created via CloudBees Jenkins Operations Center. This pipeline relies upon a definition (the Jenkinsfile) which resides within source control (the cloned GitHub repository). Assuming the correct edits have been made to the Jenkinsfile and pushed to your cloned copy of the repository, executing this pipeline should result in the sample application being deployed to your Kubernetes cluster. To manually execute the pipeline, select the ‘Build Now’ option from the navigation bar on the left edge of the screen as seen in Figure 3.
Figure 3. Manually executing the Jenkins pipeline
To verify that the pipeline is functioning correctly, please follow the directions below on the machine from which you have accessed the Cloud PKS CLI.
- On your local machine, run :
vke cluster show <cluster name>. - Look for the ‘Address:’ line, then copy the URL displayed on that line.
- In your browser, navigate to
http://<address value>:30400 - You should be on the root web page of an express (node.js) app welcoming you to the workshop this material was originally developed for. The large text header on the page should read ‘Welcome to the workshop!’. There are also 2 subpages:
- /vke
- /cloudbees
Through the first two articles in this series, we have built a fully functional CI/CD pipeline. At this point, the pipeline is manually triggered. In the third and final article in this series, we will setup and automated trigger for the pipeline so that it will execute immediately after changes are pushed to the watched GitHub repository.
CI/CD with CloudBees Core on VMware Cloud PKS Series:
- Deploying CloudBees Core on VMware Cloud PKS
- Building a CloudBees Core Pipeline which Deploys to a VMware Cloud PKS Cluster
- Triggering a Jenkins Pipeline on a ‘git push’