A Pipeline Story: Code Stream and Cloud PKS

Let me set the stage for you. I was about 2 or 3 weeks into my new job in VMware Cloud Services. My new boss reached out and said, “Hey, I need you to set up a pipeline from Code Stream into Cloud PKS.” I said that would be no problem! But, there was a problem. I had never used VMware Code Stream or VMWare Cloud PKS before in my life. Great news, they’re both so easy to use that I got this done in 4 days from scratch. Let’s talk about how I got this setup.
First and foremost, let’s talk about these two products, starting with VMware Cloud PKS. Cloud PKS is an enterprise-grade Kubernetes-as-a-Service offering in the VMware Cloud Services portfolio that provides easy to use, secure, cost-effective, and fully managed Kubernetes clusters. Cloud PKSenables users to run containerized applications without the cost and complexity of implementing and operating Kubernetes. For more information about this service and to request access, please visit http://cloud.vmware.com/vmware-kubernetes-engine. The second piece of this is Code Stream. This is part of VMware Cloud Automation Services. It offers full CI/CD as a Service. For more information about this service and to request access, please visit https://cloud.vmware.com/code-stream.
So, to make this work, I needed a simple application for Kubernetes. I found this in the Kubernetes sample applications on GitHub. I cloned the repo to here. I will be using the YAML files in the Guestbook app. The process is pretty simple. When code is committed and pushed from VS Code, or any editor, to Github, it will trigger the pipeline.
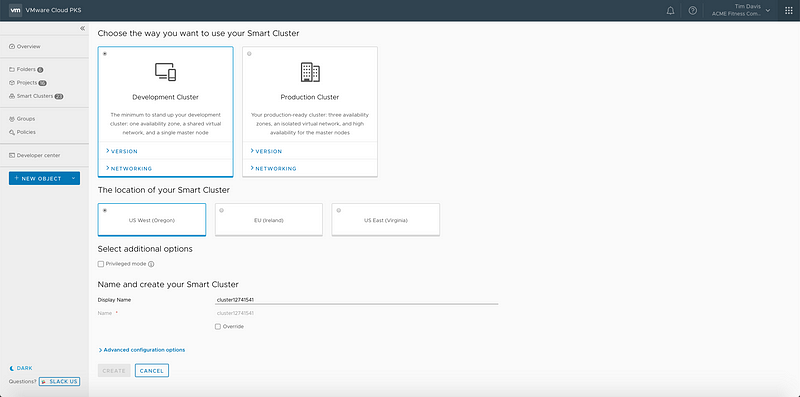
Now, I’ll also need a place to put this app. This is where Cloud PKS comes in. You can create a new cluster in Cloud PKSwith one simple config page:

With just that little bit of stuff, we now have a fully configured Cloud PKS cluster! The great part about Cloud PKS is that it doesn’t start provisioning a bunch of resources until you start deploying apps. Resources stay at 0 until you deploy, then they scale out as needed. Once you start removing things, or if the app isn’t resource-intensive, the smart cluster will scale the cluster back automatically. This cluster gives you full UI and API access into Kubernetes. Cloud PKS offers it’s own CLI which can be loaded onto just about any system. From there, you can login and very simply setup merged authorization to allow the use of kubectl just as you would with any other Kubernetes deployment:
Now let’s take a look at Code Stream. This part of the configuration has a few pieces. The endpoints, the webhook / trigger, and then the pipeline itself. First, we’re going to look at the endpoints. This is essentially the source / destinations of your pipeline content. We’ll need one for GitHub, and one for Cloud PKS(K8s).
The Kubernetes endpoint should be created with the token of a service account. This will allow you to keep the token active and not have to refresh it manually once a day. You can see that process here. This is a look at the endpoint configuration screen for that:
Once you’re done here, you’ll need a GitHub endpoint. For this, you just need your GitHub Credentials. This one is easy enough!
Now to create the actual pipeline! Go into the Pipelines section, hit New Pipeline, then create from Blank Canvas:
This is a single stage pipeline, and I made that stage “Deploy”. There are 6 “K8s” tasks in this stage, and they simply take the YAML from the GitHub repo, and deploy them in the order needed for the application to deploy properly. This is a look at that workflow:
You simply click and drag tasks from the options on the left to the canvas. Once there, you configure the tasks. For K8s’s tasks, you give it an endpoint (that we already configured) and then give it the payload source, which is our GitHub endpoint in this case:
At any point, you can click Validate on the tasks. It will make sure your endpoints are responding, and that all looks good with the tasks. I went through lots of validation failures in my time trying to figure all this out. It makes it very easy to troubleshoot issues and get moving.
Now that we have everything setup, we need to configure the trigger. So go to the home screen in Code Stream, and click Git under “Triggers.” From there will we goto Webhooks for Git, and select New Webhook. You will need the project, a GitHub endpoint, and also your API Token from the Cloud Services Portal that we used to login to Cloud PKSearlier.
Once you click Create, it will automatically register Code Stream with GitHub Apps. Now, if you make a commit / push to the repo, it will automatically trigger your pipeline, and you should be good to go.
Success! We have a pipeline, be it very simple. Next we can go in and beef up the pipeline to do all the docker builds etc right from within Code Stream! But that’s for another time.
If you have any questions or want to learn more about Cloud PKS or Code Stream, feel free to check out http://cloud.vmware.com.
-Tim Davis — Technical Cloud Specialist, VMware Cloud Services


