5 Best Practices for managing your application using CloudHealth

On the VMware Cloud Solutions Technologies team, we routinely build out several test applications across AWS, Azure, GCP to test against the VMware Cloud Services. Over time these applications have become a mainstay and with the addition of new members, the size and scope seem to be growing rapidly. In the coming months, we’ll talk about the application in more detail, but at a high level, the application is a three-tier application that has the flexibility to be run as a virtual machine or in a containerized environment using Kubernetes. The application itself is super flexible, so if you choose to run RDS as the database you absolutely can. If you want more details and are interested in deploying for your own use, you can find it here: https://github.com/ishrivatsa/vcs-fitcycle-deployer
Having worked with the CloudHealth Technologies platform for the last few months, one of the items that caught our attention was that firstly, the platform capabilities are almost infinite. We often find ourselves running into things that we have not considered or thought of previously. Secondly, CloudHealth offers some unique “perspectives”. I use that word intentionally, so in this blog entry, we’ll focus on some capabilities from a developers deployment of an application in AWS. The platform has numerous features, but in the interest of keeping it crisp (and channeling my Buzzfeed tendencies ), we’ll stick to five of those capabilities. In this blog, we will cover — 1. CloudHealth Perspectives 2. EC2 Rightsizing 3. EBS Saving and Reporting 4. Healthcheck and 5. Convertible RI’s Exchange
First and foremost*, *let’s look at* CloudHealth Perspectives*. Speaking with the product teams early during our on-boarding, we realized how powerful perspectives are going to be, so without a doubt that was the first thing we’ll discuss. You can find more details on Understanding CloudHealth Perspectives here: https://www.cloudhealthtech.com/blog/understanding-cloudhealth-perspectives. The short version is — this is a great way to view and group the components that align with a business objective. This can be a business unit, AWS account, or in the case I’m going to describe below AWS Tags. We chose to create a Perspective in CloudHealth called *“All-Fitcycle-Apps”. *Before we get to the perspective, just a little background on how the application is getting deployed in AWS. When we run the Terraform template, it provisions a new VPC, EC2 instances, Security Groups, IGW, AWS Tags that are specific to the deployment type. For e.g: We have parallel instances that leverage MySQL on EC2 instances and RDS for the back-end database. Even if I was to completely mess up my instance, the rest of the team can breathe easy that their instances are good to go! Just a quick peek at the AWS console to provide context. The instances below are filtered by the tag App: <*type of App*>. Below you can see all the tags associated with the *web* EC2 instance.

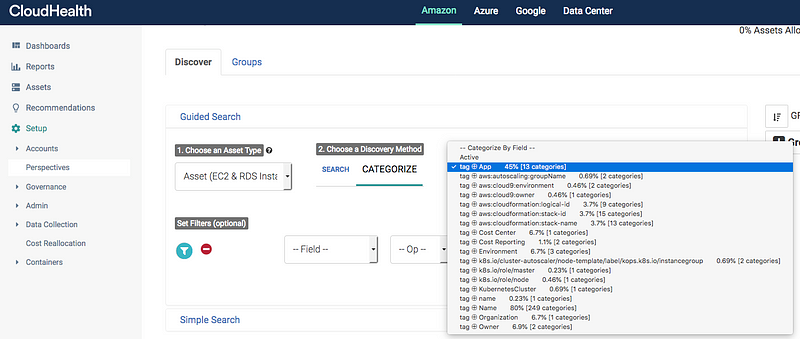
Let’s look at how we created this perspective in CloudHealth. Navigate to the Setup in the left pane, give it a name and under the Guided Search fields let’s look for the AWS tags that were created. In Step 1. *“choose asset type”, *we select *Amazon Asset. *In Step 2. *Discovery Method, we select Categorize and in Step 3., we select a field to categorize by. *Here we select *tag and as you can *see the platform offers the flexibility to use one of the AWS tags that were discovered as seen above.
 Tag discovery in CloudHealth
Dynamic Discovery of AWS Tags
This perspective allows us an easy way to group all the assets associated with all the Fitcycle applications running as EC2 instances. We run several instances to simulate development, staging, production environments and this perspective is the foundational piece. You can also create this as a “Product” perspective to enable Finance and the business to determine how much this specific application costs to develop and run in production.
After creating perspectives, one of the first items we want to look at is EC2 right-sizing. Let’s start by drilling down to one of the application deployments. To do so, we select the appropriate perspective and group we’re interested in looking at. Let’s filter by those two items.
Given this is a test instance of the application, the usage is minimal these days. We had initially spun these instances up as t2.micro’s and we instantly see there are some cost-savings by switching to a t2.nano. The CloudHealth platform also allows us to kick-off a Lambda function which will be covered as part of another blog entry in the coming weeks.
This report can be further tweaked using the Smart Filters tab as seen from the screenshot above to further drill down to look for severely underutilized instances that were launched after a specific date or have CPU usage below a certain threshold. CloudHealth collects data at both granular and macro level across CPU, memory, network, disk, IOPS, throughput, and more.
Next, one of the big areas for optimization is EBS volumes. An easy way to look at unused EBS volumes across the entire environment is by using the HealthCheck. We will cover Healthcheck in a little more detail below. In our environment, we see 35 unused EBS volumes. We can quickly drill into the details and terminate those volumes using a Lambda function if we so desire.

However, in most cases, EBS volumes require a backup or snapshot for various reasons. AWS provides several ways to create an EBS volume snapshot on schedule and export to S3 if you desire. We certainly need some checks before we go and terminate those volumes.
Using the Governance policy in CloudHealth, we can create a policy that will check for EBS Volumes that have been unattached for 4 weeks and on the first day of every month notify the admins to take action. This can once again and yes you guessed leverages the perspective group that was created. We can incorporate the Lambda function as described before by adding it as an action alongside the other options shown in the screenshot above. Although we haven’t set up our EBS volumes to snapshot to S3 yet, one consideration is to monitor S3 storage costs as well if you are considering that approach. You may want to look into the tiered storage options and also creating archival options to keep S3 costs in check.
Health Check feature in CloudHealth is a great starting point to get a quick snapshot of immediate savings opportunities, right-sizing recommendations, reserved instance usage statistics among others.
You will find the Health Check by browsing to Pulse > Health Check. You can also filter this by one of the available filters i.e the perspectives that we created above. You have the ability to filter by the knobs you wish to see, rather than a one-size fits all approach. From the screenshot, you can get a quick view of all the possible optimizations and under the Cloud Governance section, you can see the security risk exposure.
The Security framework that is being compared against is the AWS Best Practices for Security. You have the ability to switch to CIS AWS Foundations if you so desire. One of the best ways to use this would subscribe as a feed. You can click on the top right corner and hit Subscribe.
This allows you to create a new subscription for the Health Check and can be set up to be delivered every day, week or month to your email or to an S3 bucket for archival purposes. I personally would like to see a weekly update to get a quick peek at how the AWS environment is performing and we can implement recommendations in a timely manner.
Reserved Instances are easily one the best ways to reduce spending in AWS. For certain instances of our application environments that remain powered on for a significant time of the year, Reserved Instances offer significant savings over on-demand resources. If you’re not familiar with Reserved Instances, you can find details here: https://docs.aws.amazon.com/AWSEC2/latest/UserGuide/ec2-reserved-instances.html. Cloud Health has an excellent blog around this topic as well: https://www.cloudhealthtech.com/blog/ultimate-guide-aws-reserved-instances-part-1-planning-and-analysis. However, speaking with customers we often find that most customers have a mix of Reserved Instances (RI) and Convertible Reserved Instances (CRI). So what’s the difference? CRI’s allow customers some flexibility to exchange one or more CRI’s with a different configuration. There are certain conditions that need to meet in order to exchange. Details around pricing, true-up cost is beyond scope of this blog, but you can find a lot of good information here: https://docs.aws.amazon.com/AWSEC2/latest/UserGuide/ri-convertible-exchange.html
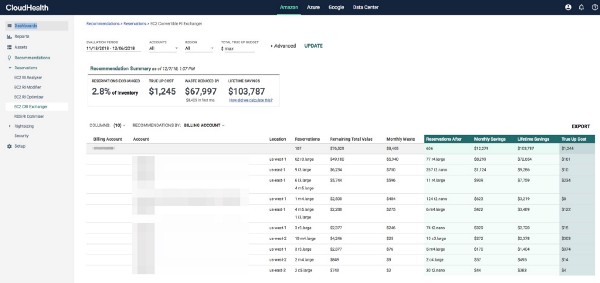
So where does CloudHealth fit into this? One of the questions that come up a lot of times is how does someone make a CRI exchange and what does the cost model look like? Cloud Health pulls in the inventory of CRI’s and provides guidance by making recommendations on CRI exchanges. This feature is a unique differentiator for CloudHealth, so let us take a closer look.
Firstly, you set a budget for the exchange, first go around leave it at zero. You can also look at specific AWS accounts if you choose to do so, but given RI and CRI purchases are best centralized, you can leave it as is. Next, CloudHealth looks at the underutilized CRI’s and on-demand resources and provides recommendations on which CRI’s are the best candidates to be exchanged and also what instance type they should be exchanged too. You can also find cost projections on likely saving and also their lifetime value. You can export this report and either go into the AWS console or have the Cloud Administrator make the exchanges. To dig in further on how we came up with those calculations click on information under Lifetime savings.
So those are my personal favorites thus far. If you haven’t tried CloudHealth yet, you can book a demo or start a free trial by signing up here; https://www.cloudhealthtech.com/
Do you use these features? What do you like/dislike about these? Curious to get your favorites. Also, let me know what else you’d like to see. Drop me a line here on Medium or on Twitter. Till then…happy savings!


