How to send CloudFormation events to Wavefront using AWS Lambda

Imagine this, it’s 5pm on a Friday afternoon and while you really want to go enjoy the weekend, you also need to deploy a new version of your app to production. Using AWS CloudFormation (CF), you add a new instance to your fleet of EC2 instances to run your app.
"InstanceType" : {
    "Description" : "WebServer EC2 instance type",
    "Type" : "String",
    "Default" : "t1.micro",
    "ConstraintDescription" : "must be a valid EC2 instance type."
}
Now it’s just a matter of running aws cloudformation deploy and your changes are in production, right on time for you to log off and enjoy the weekend. An hour later, as your app is running a high load on production and you’re having that well-deserved refreshment, your colleagues are scrambling to find out what caused the dip in performance on production. Desperate for answers, they call you and as you’re working through the traffic traces, you realize it might have been the deployment you did earlier. You go back to the CloudFormation console and see you chose a micro instance on EC2 instead of the Extra Large which has the compute power needed for your app. It’s an easy fix this time, but you could have specified the wrong environment variables, or credentials from the staging environment for production deployments.
Infrastructure-as-Code helps you manage both the codebase of your apps and your infrastructure. When you’re treating your infrastructure that way, you and the rest of the DevOps teams in your company can combine the deployments you do with other performance and health metrics on a single dashboard. Obviously, you’re not deploying changes on a Friday afternoon (are you?). Though let’s say you do deploy on Fridays and want to see those deployments appear in your dashboards? In this blog, I’ll walk through setting up an SNS (Simple Notification Service) topic to send CloudFormation events to an AWS Lambda app and from there to Wavefront to be visualized.
Getting ready
If you want to follow along with the steps in this post, you’ll need a few things:
- An AWS account to deploy a Lambda app to and to configure some other bits and pieces
- A Wavefront API token to send data to Wavefront. If you don’t have a Wavefront account, you can get a trial here
Configuring SNS
The cool thing about CloudFormation is that it can send events to an SNS topic. That way other apps can be notified when something happens in your environment, but to do that, you’ll need to have an SNS topic. From within the SNS homepage, click on the orange Create topic button and give your topic a descriptive name (like “CloudFormationEvents")

You can use all the default values, or change them as you see fit, just make sure you copy the ARN (Amazon Resource Name) as you’ll need that later on to configure some CloudFormation events.
Deploying a Lambda app
The next step is to deploy a Lambda app that will listen to events from the SNS topic and send them to Wavefront. To make sure the app knows it will get data from SNS, your “handler” function needs to have an SNSEvent as the input.
func handler(request events.SNSEvent) error {
    ...
}
A CloudFormation event sent to SNS has a bunch of useful information, but the important bits are in the “Sns.Message” field. That field contains information like which stack was deployed, which account it was deployed to (which is very useful if you separate accounts), and what the current state is.
{
    "Records": [
        {
            "EventSource": "aws:sns",
            "EventVersion": "1.0",
            "EventSubscriptionArn": "arn:aws:sns:us-west-2:123456789012:CloudFormationEvents:ff5557cc-f52e-4274-90c6-7a961d334743",
            "Sns": {
                "Type": "Notification",
                "MessageId": "12345",
                "TopicArn": "arn:aws:sns:us-west-2:123456789012:CloudFormationEvents",
                "Subject": "AWS CloudFormation Notification",
                "Message": "StackId='arn:aws:cloudformation:us-west-2:123456789012:stack/MyStack/b9e8d9b0-be10-11e9-aa8d-0a1528792fcb'\nTimestamp='2019-08-13T21:24:52.887Z'\nEventId='c9fb6200-be10-11e9-9c1a-0621218a9930'\nLogicalResourceId='MyStack'\nNamespace='123456789012'\nPhysicalResourceId='arn:aws:cloudformation:us-west-2:123456789012:stack/MyStack/b9e8d9b0-be10-11e9-aa8d-0a1528792fcb'\nResourceProperties='null'\nResourceStatus='CREATE_COMPLETE'\nResourceStatusReason=''\nResourceType='AWS::CloudFormation::Stack'\nStackName='MyStack'\nClientRequestToken='Console-CreateStack-6b6e28ac-09ab-a7ee-9cf6-20865fb3953b'\n",
                "Timestamp": "2019-08-13T21:24:52.919Z",
                "SignatureVersion": "1",
                "Signature": "",
                "SigningCertUrl": "",
                "UnsubscribeUrl": "",
                "MessageAttributes": {}
            }
        }
    ]
}
To get the data from the message field, and turn it into a proper CloudFormation event you can use later on, you can “range” over the elements to create a struct from it.
...

for _, element := range elements {
    if len(element) > 0 && strings.Contains(element, "=") {
        items := strings.Split(element, "=")
        ptrString := strings.ReplaceAll(items[1], "'", "")
        elementMap[items[0]] = &ptrString
    }
}

...

return cf.StackEvent{
    StackId:              elementMap["StackId"],
    EventId:              elementMap["EventId"],
    LogicalResourceId:    elementMap["LogicalResourceId"],
    PhysicalResourceId:   elementMap["PhysicalResourceId"],
    ResourceProperties:   elementMap["ResourceProperties"],
    ResourceStatus:       elementMap["ResourceStatus"],
    ResourceStatusReason: elementMap["ResourceStatusReason"],
    ResourceType:         elementMap["ResourceType"],
    StackName:            elementMap["StackName"],
    ClientRequestToken:   elementMap["ClientRequestToken"],
    Timestamp:            time,
}, nil
To send the data from your Lambda app to Wavefront, you can create a WavefrontEvent and send that to your Wavefront instance using your API token.
evt := WavefrontEvent{
    Table:     "",
    Name:      fmt.Sprintf("CloudFormation Event for %s", *event.StackName),
    StartTime: event.Timestamp.Unix(),
    EndTime:   event.Timestamp.Unix() + 1,
    Annotations: Annotations{
        Severity: "info",
        Type:     "CloudFormation",
        Details:  fmt.Sprintf("Event ID %s (%s)", *event.EventId, *event.ResourceStatus),
    },
}

...

req, err := http.NewRequest("POST", wavefrontEventURL, bytes.NewReader(payload))

...

req.Header.Add("authorization", fmt.Sprintf("Bearer %s", wavefrontAPIToken))

...
The full source code of the AWS Lambda app is available on GitHub so if you want to deploy an already existing app, you can clone the source code and update the YAML template.
git clone https://github.com/retgits/wavefront-cf-notifier
cd wavefront-cf-notifier
make deps
make build
Before you can deploy the app, though, you’ll need to update the “template.yaml” file in three places:
- Line 26 should be updated with the ARN of your SNS topic
- Line 33 should be updated to your correct API endpoint for Wavefront
- Line 34 should be updated with your Wavefront API token
With the changes to the template made, you’re ready to deploy using two “make” commands.
make package
make deploy
Once the deployment is finished, you’ll have a Lambda app running that’s listening to CloudFormation events and is ready to send them to Wavefront.

Adding events to Wavefront
Using the Wavefront Query Language, you can add events to your charts by adding a new query. If you want to add all events, you could add the query:
events(name="CloudFormation*")
If you want to only add events for a specific stack you’re deploying, which is a little more likely, you can add the query:
events(name="CloudFormation Events for <name of your stack>*")
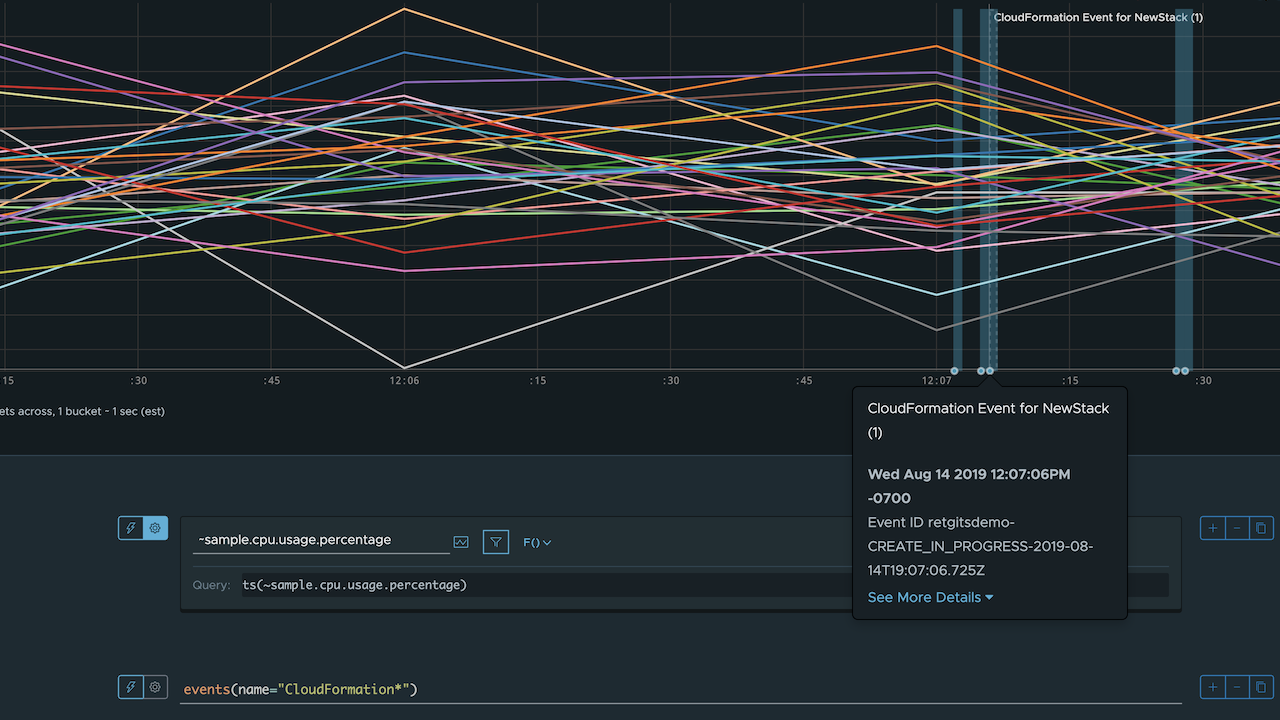
Using the query language, you can overlay the events on the chart and get a similar graph to this one. The event doesn’t only show that an event occurred, but also which stack it was.

The blue circles at the bottom show when an event was triggered by CloudFormation and the blue overlays show the duration of the event.
Triggering CloudFormation events
Now that everything has been deployed, you’re all set to make use of the events and make sure your team knows exactly what’s going on. The only thing left is to make sure the CloudFormation scripts you have are updated with the notification endpoint. So for example, if you’re deploying a stack using the EC2ChooseAMI template, you can add the NotificationARNs right inside the “myStackWithParams” element.
{
    "AWSTemplateFormatVersion": "2010-09-09",
    "Resources": {
        "myStackWithParams": {
            "Type": "AWS::CloudFormation::Stack",
            "Properties": {
                "TemplateURL": "https://s3.amazonaws.com/cloudformation-templates-us-east-2/EC2ChooseAMI.template",
                "Parameters": {
                    "InstanceType": "t1.micro",
                    "KeyName": "mykey"
                },
                "NotificationARNs": [
                    "<your sns arn>"
                ]
            }
        }
    }
}
If you’re deploying CloudFormation stack using the AWS Console, make sure you set the “Notification options” to your new SNS topic in step 3 ("Configure stack options")

Next steps
The events coming from CloudFormation, your Infrastructure-as-Code, will now show up in dashboards from Wavefront, so your entire DevOps organization now knows what happened and which CloudFormation stack to look at. This could save time while debugging and figuring out where the issues might come from. If you’re part of a DevOps team that deploys using AWS CloudFormation and you want insight into the deployment events, feel free to grab the code for the Lambda app from GitHub. Let me know your thoughts and send me or the team a note on Twitter.


